Blum and Vecnum: high-end bike component automation
Vecnum from Isny (Germany) develops and manufactures components for mountain and gravel bikes. In production, touch probes and tool probes from Blum-Novotest ensure that the required high accuracy is achieved with process reliability and that machining is automated.

For Vecnum, high manufacturing quality is not just an end in itself: play in the joints of the suspension stem would severely impair the riding experience. At the same time, high forces act on the joints when the rider pulls on the handlebars while pedaling. "High oblique forces also occur with the seat posts when the rider sits on them. With high dynamics due to pedaling and the ground," explains company founder Marcell Maier. "Nevertheless, the smallest amount of play is also undesirable here, which is achieved through selected materials and the precise manufacturing process. For example, the upper telescopic tube with the connection for the saddle is extruded in one piece from high-strength aluminum."
Although the parts of the Vecnum products are relatively small, the machining performance is considerable: the aluminum parts of the freeQENCE stem are manufactured from blanks with an initial weight of two kilograms, leaving 300 grams at the end. The freeQENCE parts are currently milled from solid material. Machining is carried out to an accuracy of one hundredth of a millimeter in the envelope, so you have to stay within half a hundredth per machining side. However, the inaccuracy is in the region of a hundredth due to the heating of the machine during machining alone - so the specialists in Isny have to constantly measure and compensate.
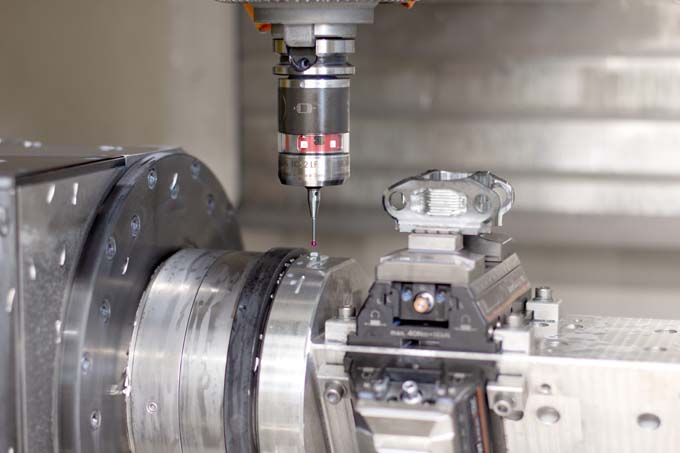
The two Robodrill machines in production are each equipped with a TC52 LF touch probe and a Z-Nano tool probe from Blum. The abbreviation LF stands for 'Low Force', the probe works with a measuring force of just 0.65 N when probing in X/Y instead of 2.3 N. The reduced measuring force is particularly advantageous for styli with very small ruby balls or delicate workpieces. High precision with a repeat accuracy of 0.3 µm 2 σ is guaranteed by the multidirectional Blum measuring mechanism on the TC52 LF. Vecnum receives the seat posts as flow-forged blanks, with the oval inner contour and a groove already machined with the broach. The inner contour is measured with the TC52 LF measuring probe so that the outer contour can then be produced in the exact position.
The Z-Nano probes are used to measure the tool length and, for example, to compensate for the change in length caused by the heating of the machine. In the case of sensitive tools such as a 0.8 millimeter drill, a breakage check is also carried out after machining. This works very quickly and reliably, as the measuring mechanism of the tool probe works with very low measuring forces due to the ball-bearing linear guide and lateral forces acting on the tool are excluded. Measuring cutterheads with the Z-Nano tool probe provides an aha effect: all cutting edges are measured and it turns out - no matter how precise the tool is on paper - that individual cutting edges are longer than others and therefore the dimension of the machined surface is different than expected. In this case, measurement during the process is a very important factor for high-precision production.
All the more so because Vecnum does not have a temperature-controlled workshop and does not work around the clock. The outside temperatures and the heating of the machine due to the high cutting volume ensure that the machine geometry changes. To ensure the necessary tolerances on the components, they also rely on measurement technology despite temperature compensation. This is why the machine is recalibrated before each machining operation. This has to be done very quickly - and there is no substitute for in-process measurement. Especially when the measuring points can be approached at a feed rate of two meters per minute, as is possible with the Blum probes. Vecnum recently received an update from Blum for the measuring cycle on the Z-Nano. The new cycle saves a few seconds per measurement by carrying out the pre-positioning, i.e. the first approach of the tool probe, in rapid traverse. This saves a lot of time when, for example, the tools are changed during set-up for a new machining job and all 21 tools in the turret head are measured once.
Marcell Maier has a wealth of experience and knowledge in the field of machine tools from his professional life. He is also still active in this sector with his engineering firm. He grew up with touch probes and has familiarized himself with the products of various manufacturers: "I like the Blum probes very much, the measuring accuracy is extremely high, the measurements are very fast and the entire measuring system is absolutely reliable. We are therefore very satisfied with Blum-Novotest as a partner, from the products to the support." And something else is very important to the Managing Director: "You often hear the opinion that a touch probe is superfluous on small machining centers - I think that's completely the wrong approach. In order to be able to consistently produce the highest quality, measuring during the process is essential."
Source: www.vecnum.com
This article originally appeared on m-q.ch - https://www.m-q.ch/de/blum-und-vecnum-high-end-bikekomponenten-automatisierung/


